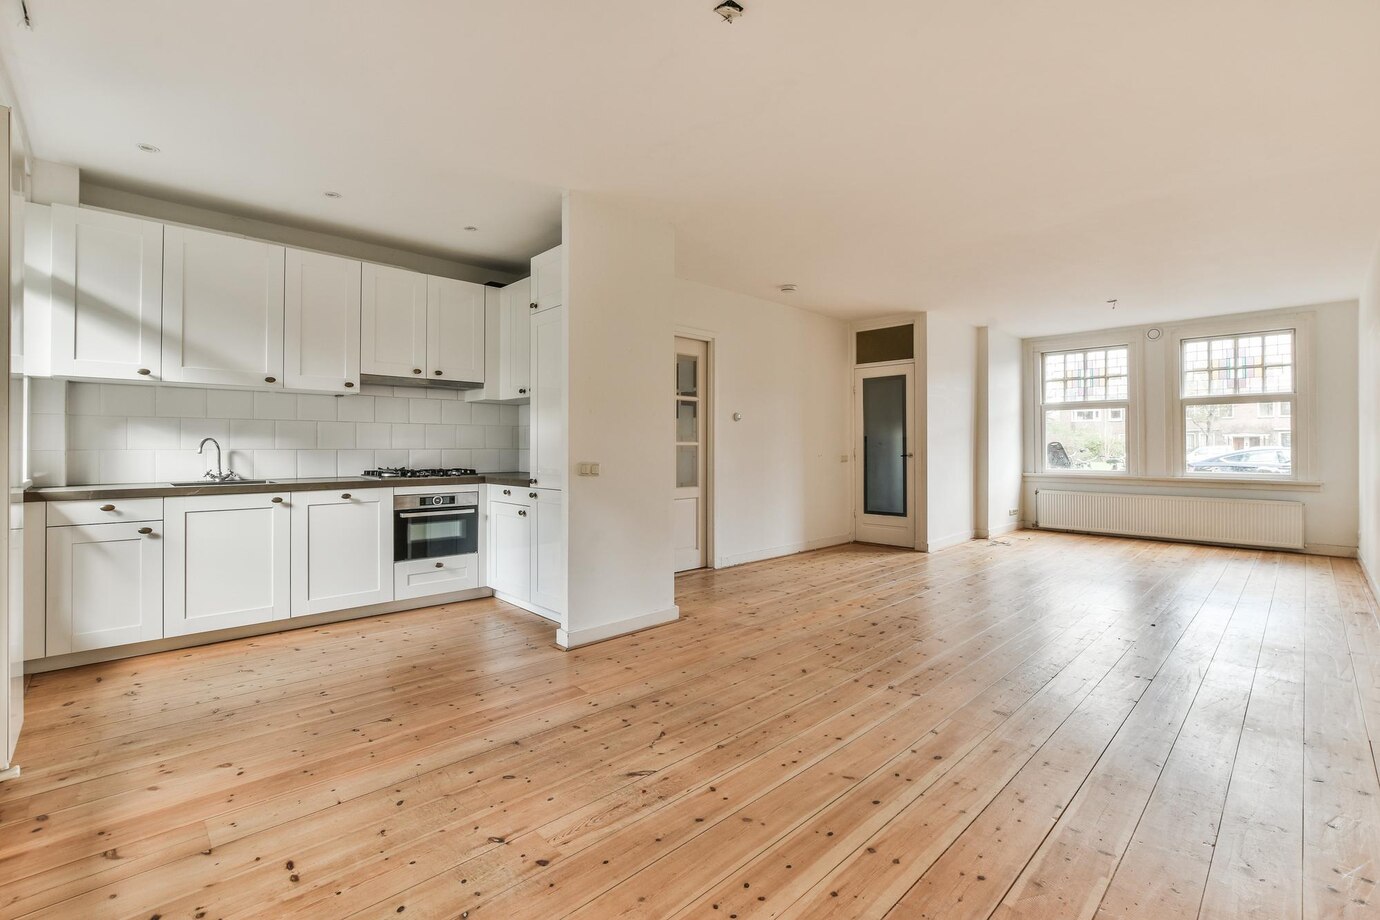


Last time I posted, I shared the first part of our kitchen makeover, which was installing wide plank “hardwood” flooring. After the floors were upgraded, my dad and I started on the oak cabinet makeover. This was a very time consuming process, but the steps are fairly easy to complete. Here, I walk you step by step how to paint outdated cabinets.
Step 1: Prep Your Cabinets
- Remove your cabinets and hardware.
- Keep all the hardware in a safe place. We stored ours in Ziplock bags in each cabinet where the door was removed.
- Degrease and clean your cabinets. We used Krud Kutter, and it worked great.
- Lightly sand your cabinets using a fine grain sand paper. I recommend 220 grade.
Step 2: Paint the Interior Doors (3 Coats)
- Paint the interior doors first.
- Use a roller brush with a professional microfiber grade (5/16th nap).
- Apply a thin coat of paint, rolling brush in one direction.
- Allow 12 hours to dry between coats. We dried ours on paint cans to ensure they did not stick or drip to the floor.
Step 3: Paint the Exterior Doors (3 Coats)
- Paint the exterior doors last.
- Use a high quality paint brush to paint any molding.
- Use a roller brush with a professional microfiber grade to paint all flat surfaces.
- Apply a thin coat of paint, rolling brush in one direction.
- Allow 12 hours to dry between coats.
Recommended Supplies
1. Fine Sand Paper – Use a very fine sand paper when sanding your cabinets. The point is to break up the gloss, not totally remove it.
2. CabinetCoat – This is a Benjamin Moore product and the best around. The paint is self leveling, so it naturally smooths out any brush strokes and bubbles if you lay your cabinets flat. The paint comes in a nice white, but we tinted ours “Dove White” by Benjamin Moore.
3. Professional Grade Microfiber Roller – You want a fine microfiber roller to prevent any brush strokes. I used a 5/16th nap.
The cabinets turned out brilliantly. The paint dries with a durable finish, and you can see the grain through it. I am so pleased that you did not lose the real wood look of them.
After the cabinet doors were completed, I painted the frames/bases and added modern hardware. Before you embark on painting your cabinets, let me know if you have any questions. I am happy to help. This project was worth every penny and every minute we spent on it. Thanks, Dad!